Sunday 29 April 2012

Super Scrimping nails


Another nail post, but I couldn't help myself, this top tip is too good not to share. Whilst at a friends a few weeks back, an episode of 'Super Scrimpers' came on. Not a programme I usually care to watch, however, filled with money saving ideas, one in particular grabbed my attention, and the idea was so simple!

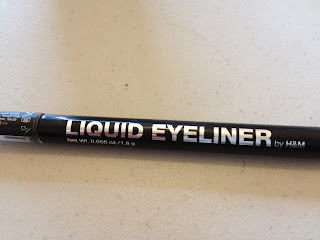
The hype of nail art has hit a high with everyone giving it the DIY treatment, but have you noticed how expensive those little bottles of varnish with the tiny nail art brushes are? You could always order them in bulk from eBay but why not just use something you probably have lying around? In this case, liquid eyeliner. 


Most of them have small brushes, but I prefer my fine liner eyeliner from H&M, does the trick nicely! Simply put a coat of colour on, and depending on what style your doing (I have tried leopard print and tribal) put some dots or lines of a different colour and then draw a design over the top! 


There are loads to have a gander at on the internet for some inspiration, and once you've got the hang of it, the effects are impressive! You can try it with different styles, colours and designs, the possibilities are endless! 
To stop the eyeliner from smudging I put a coat of clear Top Coat on and this makes the design stay on for longer as well.


Some of you might already be doing this technique but those of you who didn't know, why didn't we think of it before? If you've got some eye liner lying around and feel like procrastinating, give a bit of nail art a whirl! 


(My right hand required intense concentration, so if your not so good at one hand than the other maybe get a friend to finish it off for you!)

If you have given this tip a go, take a photo and send it to me, or just let me know! I would love to feature the best ones on here :) 

Friday 27 April 2012

Nicole Farhi Event at Harvey Nichols


Just a quick post about the event I attended the other evening at Harvey Nicholls showcasing Nicole Farhi's new Spring Summer collection with the designer herself as a special guest! Champagne was handed to us on entry (I could get used to that) and we took our seats among the increasingly bustling scene in the ladies wear department. 
CanapĂ©s were then handed out and as things got under way the chatter diminished and Nicole took her seat in front of the crowd along with the host. 

A run through of some of the designers favourite outfits from her collection were presented to us with a short description about the inspiration, the design, the style, the colours and even the construction of the garments. (below)

 This print features in a few of Nicole's pieces, the florals patterns and tones would look perfect in a Spring wardrobe. 
 Nicole sat next to the host, a freelance journalist in Manchester, who described what the models were wearing.
 I loved this jacket, made from parachute material and lined with mesh it fits perfectly into the sport chic trend. 

 Another popular print, grid like texture, belted with a hat screams effortless elegance. 
  This was definitely my favourite, the white floral laser cut shift dress, although I wouldn't have gone naked underneath as the model dared to do. 


 After the presentation, the guests got a chance to shop the collection with a special discount. Despite my love for the structured peach dress, (£350) the price tags were a little over budget so we just admired the models (below) and pondered how they could be real?! perfect skin, hair and the clothes to match, we were almost starstruck. 


 Our jealousy and lack of funds quickly drove us out the door and into the loving arms of Boots, were I proceeded to spend a hefty amount, including my very first pot of anti wrinkle cream! (post to follow) But back to the event, all in all, it was nice to see the collection and amazing to see the designer up close, but unless you had the bottle to go up and talk to her, there wasn't much else on the agenda! 

We attended this event through manchesterfashionnetwork.com. I would recommend an RSVP to local events as they are a great way to network especially if your a fashion blogger! 

Sunday 22 April 2012

Fishy Delishy


I'm trying my hardest to stay connected to the blogging world but revision calls! I promise there will be more insightful posts after the 8th of may! But for now however, a post about hair. The fish plait in particular. This marvellous hair styling technique is always popping up on Instagram on the fashion pages. There are a million and one different ways to wear this 'do' and there have been plenty of celebrities trying it out recently. 

 Not the biggest fan of Vanessa but she wears the fish tail well. 

I like the way Pixie Lott has done it in a parted head band style.

Rihanna's redness brings out the shape of the plait nicely! 
Here are some of my favourites from Instagram, all by Admirable Fashion and Fashion Dreams. 


 To try and describe it simply is a bit of a mission but here goes. Split your hair (or the pieces you want to use) into two sections. Take a little piece from one of the sections and pass it to the opposite side, the smaller the piece the better it will look. Repeat this keeping it as tight as possible all the way down your hair and voila! That was very basic so if your having trouble get onto Youtube for some tutorials. Here is my attempt (below) yes, its dark yes, I don't have any make up on and yes, I'm in bed, but a post is a post! 


My guess is this simple style is a bit hit for summer, so give it a try! 

Thursday 19 April 2012

Trend: The Bralet


These simple little tops have been cropping up all around the high street and I recently invested in this one above from Topshop, which I love and can't wait to wear! They are the perfect summer ensemble to match denim shorts on a scorching day, or a skater/pencil skirt and heels on a night out as well as being ideal for a good festival look! Available in a range of colours and styles to match your wardrobe and suit your shape, this season, the bralet is here to stay. The biggest culprit is Topshop with the best selection but others sporting the trend are River Island, Republic and Misguided. Below are a few of my favourites!

Bralets


Tuesday 17 April 2012

DIY: Laptop Cover


I've been trying to find a laptop case for ages, after a while I'd had enough, so when I came home for easter, I ventured into the study and found all my old A-level textiles stuff. I thought I may as well save money and make one. And if you want to try one too, here's how....

1) Find the material: I found some nice material that my mum used for blinds in our old house. Kind of reminds me of Erdem's T shirt material for Topshop, which I loved. Another thing you can use is canvas bags, I have quite a few lying around which I got free from various shops (Primark, Mulberry, Topshop)  and most have nice patterns on them. 
Cut it to an extra 1 inch either side of your laptop to leave room for seams and a zip. Mine is 13 inches and so I cut it to 15 inches wide. You will two of these pieces, one for each side of the case. 


 2) Get some wadding: I had some lying around the house, but it's really cheap to buy from your local fabric shop, and you shouldn't need much. It helps cushion the laptop to avoid breaking when there bumps and scrapes. I also used it as a quilting affect on the material. 
Cut two sides of this out, the same size as the patterned material your using and pin one to each side. 


3) Decorate: My material has a pattern on it, I used my sewing machine to do free embroidery around the shapes and define the lines, it also gives the case a bit of definition and a more 'artsy' look. You can do this with any pattern and if you don't have a sewing machine, try it free hand. 


4) Measure and Overlock: I drew around my laptop with chalk and then made sure there was enough room around the edge to fit it in, I then sewed around the edges and overlocked using a zig zag stitch. Leave the top side as this will be where the zip is placed later. You will definitely need a sewing machine for this part, so if you don't have one maybe pass it on to a friend or relative who can do this for you quickly.


5) Attach a zip, I used a white 13 inch zip and hand sewed it as tightly as possible to the edge. You will need to pin it in place first, and you may even want to tack it quickly to secure it even more.


6) Put a lining in: Use two sides of plain white cotton, both 13 inches wide, sew around the edges (except the top) and place it into your cover. Then fold the top edge by about a centimetre and sew to the top near the zip on the inside, by hand, as neatly as you can. You can skip this part out if you want, but it does make the inside a bit more attractive. 


And there you have it! Your hand made laptop cover in 6 easy steps! It's saved me money, it looks pretty and now I don't have to carry my laptop in a plastic bag to uni! Bonus!